|

 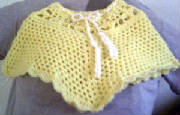
Childs Sunnytime Poncho
Ch 62( I crochet really tight so if you crochet lose adjust the amount of chs)(the petal takes 4dc
mesh sts)Join with sl st to make circle of neck
Row 1: sc in the st across
Row 2: ch 3 skip 1 sc dc in next, *skip on sc dc in next repeat from* across Makes the mesh
Row 3: * 2-petal cluster When completed, this cluster will make two petals, one with
a ch-3 and 2 dc, one with 3 dc.
ch 3, yo once, insert hook in top of previous dc in same row, yo, pull through st,
(yo, pull through 2 lps on hook) 1 time, yo 1 time, insert hook in same st, yo, pull through st, (yo, pull through 2 lp on
hook) 1 time, yo twice, insert hook in next dc of previous row, yo, pull through st, (yo, pull through 2 lp on hook) 1 time,
yo 1 time, [insert hook in same st, yo, pull through st, (yo, pull through 2 lp on hook) 2 times] twice, yo, pull through
all 6 lps on hook, ch 1
left petal cluster This cluster will form the third petal of the flower, and consists
of a ch-3 and 2 dc
ch 3, yo once, insert hook in center loop of two-petal cluster, yo, pull through st, (yo, pull through
1 lp on hook) 1 time, yo 1 time, insert hook in same st, yo, pull through st, (yo, pull through 2 lps on hook) 2 times, yo,
pull through all 3 lps on hook repeat from* across
Row 4: top petal cluster This is makes the fourth petal of the flower, and is simply
3 dc clustered together.
yo twice, insert hook in center loop of two-petal cluster, yo, pull through st, (yo, pull
through 2 lps on hook) 2 times, [yo 2 times, insert hook in same st, yo, pull through st, (yo, pull through 2 lps on hook)
2 times] twice, yo, pull through all 4 lps on hook You will have to finish mesh on this last row with trc to give the
flower it's room.Row 5: hdc in all st across
Row 6: then do the st from CrochetByTheHooks Simple Wimple ch 1, sc in same st as join, ch 1, (sk 1
st, sc in next st, ch 1) around, join in first sc. (45 ch-1 spaces and 45 sc) turn, (sc in ch-1 space, ch 1) around. Join
in first sc. (45 ch-1 spaces and 45 sc)
Finishing rows I hdc for one row around and then I do a shell to make a lacey look on bottom I usually
do sc hdc in one st then 2dc in one st and then hdc, sc in next st and then start over to make the lacey bottom. Went back
to top and did a sc in opposite color or on the little yellow one I added the mesh st in sc so I could add a drawstring.

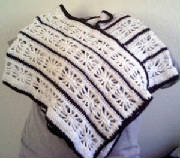
I made two rectangles in the length desired to get size desired. I added the black hdc row between
each finished spider web row. The rectangles measure about 28 in. but I made it small for a small person. I also used two
strands of Luster Sheen cotton thread but would figure on strand of say Simply soft yarn would be about the same. Then sew
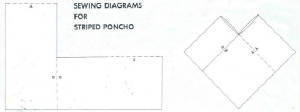
the rectangles together there is a picture of how to on down my page.
Spider Web Stitch
Use multipules of 13 + 4chs
Example Ch 30
Row 1: Dc in fourth ch from hook and in each ch across
Row2: (Right side)Ch 3 turn dc in next dc and in each st across
Row 3: Ch 3 (counts as 1st dc now and throughout) turn dc in
next dc *ch5 (skip next 2 dc, tr in next dc) 3 times, ch5 skip next 2 dc
dc in next 2 dc repeat from* across
Row 4: Ch 3 turn dc in next dc *ch 4 skip next 4 chs sc in next ch sc in next
3tr and in next ch ch 4 dc in next 2 dc repeat from * across
Row 5: Ch 3 turn dc in next dc* ch 5 skip next sc sc in next 3 sc
ch 5 dc in next 2 dc repeat from* across
Row 6: Ch 3 turn dc in next dc* ch 2(tr in next sc ch 2)3times
dc in the next 2 dc repeat from*across
Row 7: Ch 3 turn dc in the next dc* 2 dc in the next ch-2 sp
(dc in next tr 2 dc in next ch-2 sp) 3 times dc in the next 2 dc repeat from* across
repeat Rows 3-7 for pattern
Last Row: Ch 3 turn dc in next dc and in each dc across and finish off
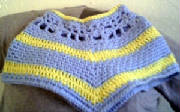
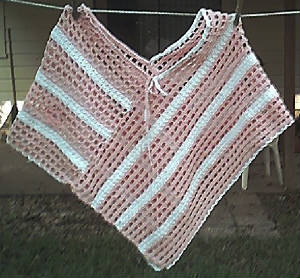
Pink & White Striped Poncho
 Materials: 3
skeins of Red Heart Cotton/Acrylic in
Pink and 2 in Red Heart Cotton/Acrylic
in White. Depending on gauge you desire
use hook you desire.(I tend to crochet
with smaller hooks I like my crochet tight)
Begin with 146 chains(or longer for desired
size)
Row 1: Single crochet length of beginning chain, ch 5 turn
Row 2: Skip 2 chs dc in 3rd ch, ch 2, skip 2 ch's, dc in 3rd ch all the
way to end, ch1 turn
Row 3: sc in every ch to end, ch 5 turn
Repeat rows 2 & 3 till you have for lattice sc strips.
Row 4-8: Then
tie off and tie in White.
Do 4 rows of the Leaf Stitch which is ch 1,skip first ch ,do 2 sc in
next stitch, skip next ch then two sc in next stitch all the way to end, ch1 turn and skip first chain and repeat pattern.
Here is my thoughts. You can use any sitiches for the stipes. Go crazy!
There should be 4 pink stripes and 3 white.
Make two of these rectangles just alike. Mine are
about 31" long but I would need them alittle longer to fit me this is for someone more from100 lbs to 150lbs. Then sew together
as picture below demonstrates.
I ran out of pink right at end so I could not do a final
sc on edges of second triangle so I used white same on neck and then added a tie so neck can be pulled in if desired. It worked
cause it just follows the striped look.
Not a good picture of example but I think you can get the
idea.
 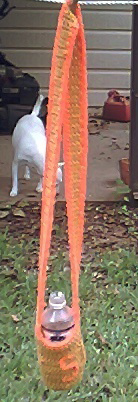
Water Bottle Holder
You can pretty much do what you want here. I used worsted weight yarn from Red Heart.
I always use a J hook.
Ch 4 Slt to join Ch 1
Row 1: 8 sc in ring slt in ch 1
Row 2: 2 sc in every sc around slt in ch 1 for total of 16 sc ch 1
Row 3: sc in ch 1 and next 2 sc then 2sc in next sc repeating all the way around slst
, ch 3 Now you can adjust the size of the bottom to fit your water bottle. So if you need a bigger base repeat
row 3.
Row 4: dc in back loop of next 5 sc, dc 2x's in next sc, dc in next 5 sc, dc 2x's in
next sc all the way around this gives it room for the bottle. slst, ch 1
Row 5: sc in every st around join with slst, ch 3
Row 6: dc in every sc around ch 1
Row 7: sc in evey dc arounf slst ch 3
Repeat this for as many rows as you need to make the height of your water bottle,
Handle: When you have finished the holder turn and sc 3 then ch 1 turn sc in the 3
sc ch 1 turn sc in the 3 sc and repeat as many times as you want the length of your handle.
Then I attach the other side of handle with sc and the trim it in sc in either the
same color or a different color as I did.
This is so easy and only took me 30 min. to make.
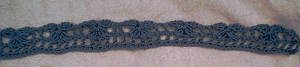
| This is the straight line method, top of petal not |
|
| done but you get idea |
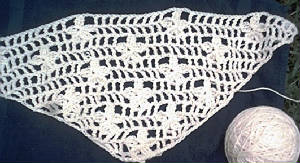
| Flowers done in triangle |
|
My Version of the 5 Petal Flower Stitch with
Lattice.
Directions:
For straight line. Ch whatever
you need in 6's.
So I chained 36 turned and sc back then ch 5 and
turn trc in 2nd chain, ch 1, skip ch trc do this
accross to make first row of lattice. Ch 5 turn
make 1 lattice stitch and then we will start 1st
Flower by ch 3, trc in 3 ch leaving a loop on hook
trc again in same stitch leaving 2nd loop on hook
3rd trc in same st. three loops left on hook leave them
and do a trc in next trc of lattice leaving a loop on
hook, trc 2nd and 3rd time this will leave 6 loops on
hook now skip next trc and do a trc in next trc of lattice
repeating trc 1 and 2 and 3 you will now have a total of
9 loops yarn over and pull thru all 9 loops. This makes
first three petals sc to tie off them and ch 3 and trc in
tie off sc leaving 1 loop then trc again leaving second
loop
and 3rd one leaving three loops on hook yarn over pull thru
all 3 loops making 4th petal. Ch 1 trc to make one lattice and start process over now that is if you are going in row you
would finish row with how ever many 4 petal flowers then you would turn and repeat lattice at lattice till you got to flower
then ch 3 trc in middle of 4 petal flower three time for 3 loops left yarn over pull thru 3 loops making last and 5th petal
trc in next trc then 5 petal flower made. repeat these stitches both lattice and flower until done.
Now if you were doing in a triangle
shawl
I ch 9 trc in 1st stitch, ch 3 trc in same stitch, ch 6
turn trc in 1st stitch (which is turning st) then ch 1 trc in middle st of ch 3 space, ch 1 trc in next trc st, ch 1 trc in
middle st of ch 3 space to end, ch 6 turn and start again
but only 3trc then start 4 petal stitch and turn and finish then turn what I did when I was doing the triangle is staggered
flower stitches. It is all real easy and repeatitive.
If you have any problems or YOU CAN
HELP ME WRITE THE PATTERN WHERE IT IS EASIER TO UNDERSTAN I WELCOME THE HELP I AM NOT VERY GOOD AT WRITING OUT THESE THINGS.
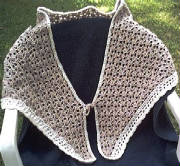
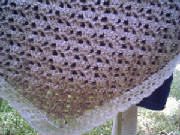
Pretty Shell Shawl
Original by Sutty Lear(Other Photos on Making of a Pattern) Black
spot is from camera not on shawl.
Required Materials:
The needle size is your choice depending on look you are going for.( I crochet loose so I
always use smaller)
Yarn I used Red Heart TLC Ultra Soft in Linen
I used Red Heart Worsted Weight in Ecru for border
Directions:
Ch.9 trc in 1st st, ch dtrc in same st which forms point at bottom of shawl, ch 6 and turn.
Row 1: dc in same st as turn, ch 1, 3 dc in middle dc to make first shell, ch 1, dc in 4thch,
trc also in 4thch, ch 6 turn
Row 2: dc in same st as turn, ch1, 3dc in next single dc(shell made), ch 1, dc in middle dc of
shell, ch 1, 3dc(shell), ch1 dc in 4thch, trc in same chain, ch 6 turn
Row 3: dc in same st as turn, ch 1, 3dc(shell made) in next single dc, ch 1, dc, ch 1,
3dc(shell), ch 1, 3dc across till last shell made in last single dc then ch 1, dc in 4th ch st, trc same stitch
ch 6 turn
Repeat this row adding shells every row made until size of shawl you desire is made. Either
add fringe or I added an edging in another color. Have fun and run with it.
Edging on Mine:
I did two rows of Lattice, chain 1 ,skip st, hdc in next st
Then I did three dc in every other ch 1 space and sc in the other.
This pattern is for personal use only. Have fun with this, and, as long as you don't sell the pattern,
you can do whatever you want with the finished product.
|